Dashboard – Multi function display screen

Aprilia Caponord ETV1000 Rally-Raid Arduino 4D Systems SDK-ULED-35D-AR display
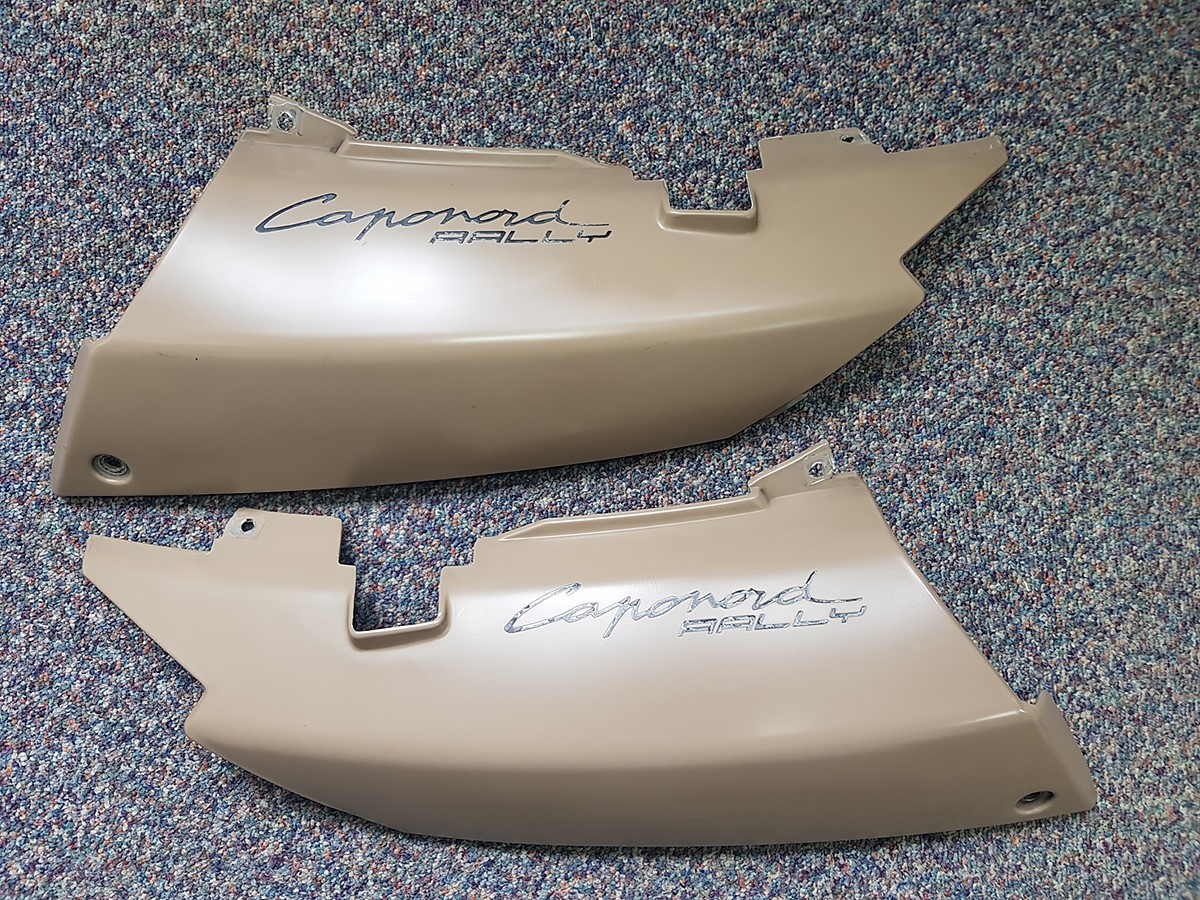
More years ago that I care to remember, fellow Caponord owner (Beasthonda) and I discussed the idea of replacing the dashboard LCD panel with an LCD screen that could be made to display just about anything we wanted. At the time, we looked at 4D Systems and made a few notes on feasibility,  but in the end the idea fizzled out – primarily because at that time the panels were expensive!

Aprilia Caponord ETV1000 Rally-Raid Arduino 4D Systems SDK-ULED-35D-AR display
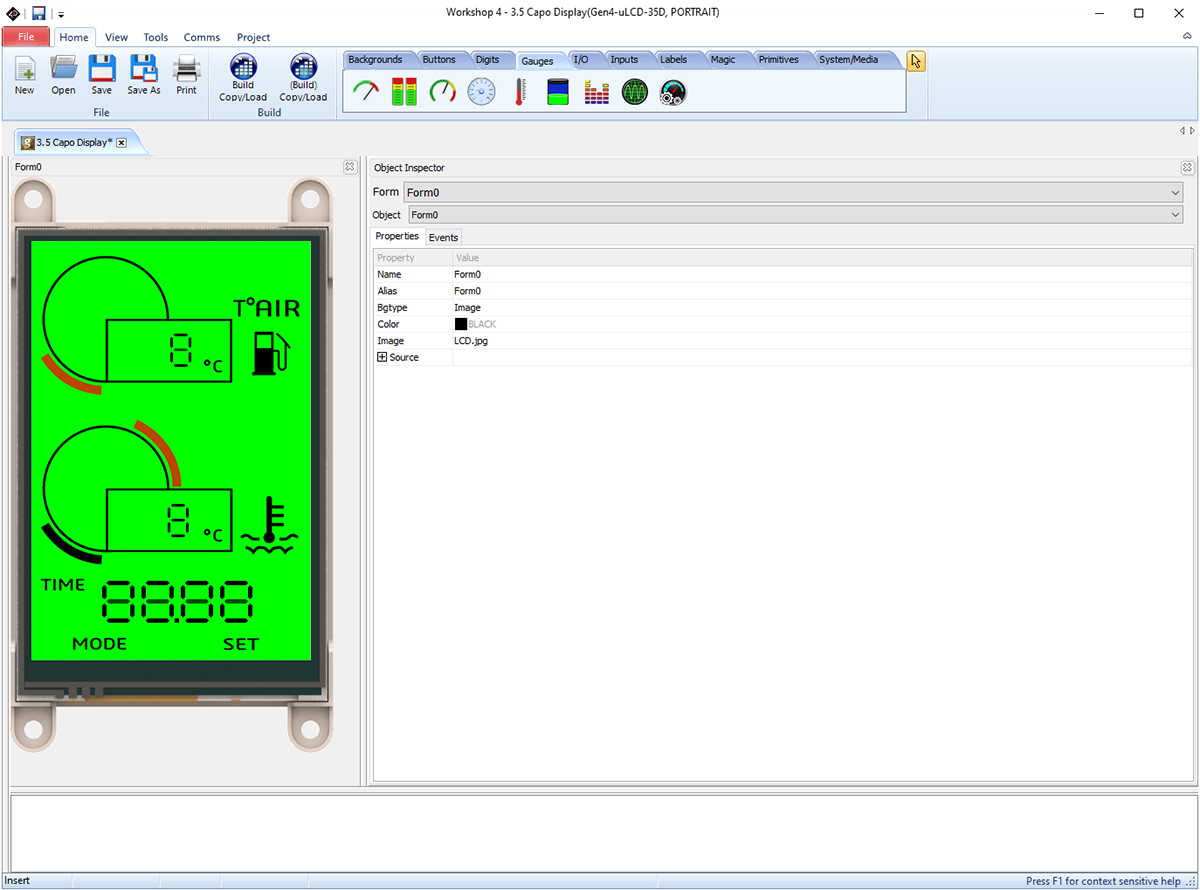
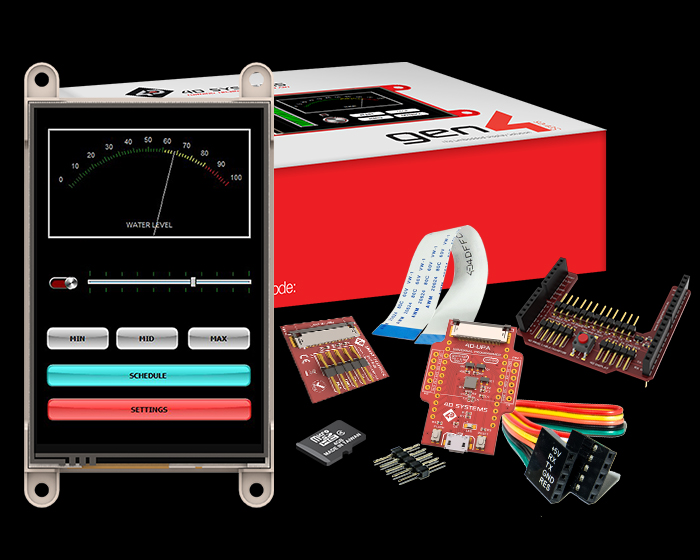
Well here we are, a toe-dip into 2020 and the idea has been resurrected. This in part is due to the panels being better and cheaper now as well as the Arduino boards being much more powerful and faster than the old generation. So as I write, winging it’s way from Australia is an SK-ULCD-35D-AR kit …. basically a 3.5″ non-touch sensitive screen with all the cables and bits to program and connect it to an Arduino device.

The idea is to emulate the existing panel layout for day-to-day riding. However the device will have alternative screens available. The first will be the real-time display of sensor data from the ECU, the second will be a detailed trip computer, displaying continually updated fuel consumption and fuel tank range among other things. The next will display GPS position using a fusion of on-board GPS and Bluetooth mobile link for map downloads.

The display turned up a few days ago. Early the next morning, while the world shivered outside, I managed to program it with a couple of basic screens and power it up for the first time. The displays need to be scaled to fit the aperture in the dash overlay, but other than that it’s pretty much ready to hook up to some data. Role on the weekend!

Powder coated cam covers

** I intended to post this back in October!**

Let me start by saying they were cheap and I was curious ….. They were cheap for a reason though. They were most definitely NOT the magnesium cam covers in the EBay advert photographs! Oh well, they were physically fine, just scratched and one had a little surface corrosion under the paint. 

So I had a brainwave, take these and the spare pair of Caponord cam covers to be powder coated. Use them as test pieces before letting someone loose on more important bits of the Capo. A lovely idea in principle, but around here powder coaters are thin on the ground, so Google was my best friend for a few minutes. Initially I looked at the ones with websites and they were either too industrial or too far away. Then I looked at one about 20 minutes from where I work. No website, but good reviews from other social media and some examples of his work – so I made contact.

Aprilia Caponord Rally-Raid ETV1000 powder coated cam cover

And here is the outcome of that meeting …. One of four cam covers in ‘Anodic Bronze’, with a one week turnaround for £60 inclusive. I’m happy with that. I think it’s fair to say that Sam is a man of few words, who’s happy squirrelled away in a modern workshop out in the sticks, doing what he enjoys. Communications were excellent and he did a great job in the time frame quoted, at a reasonable price. Next then a Caponord oil tank, passenger footpeg hangers and some crash-bars and various brackets – In RAL9011 Graphite Black.

Tuono clutch cover – AP0610992

AP0610992 Aprilia Tuono ETV1000 Caponord clutch cover magnesium

Well it was a long time coming … I mean a looonnnggg time. Try several years in fact. But was it worth the wait? Well I think so, but hey, I’m biased! 

Here it is …. AP0610992, a gold(ish) Magnesium clutch cover from a Tuono (2006-2010). It seems they are harder to come by in an as-new state than the proverbial rocking-horse doo-dah. All the ones I’ve seen have either been mullered by over enthusiastic riding Gods (crashers) or are brand-new at silly Aprilia pricing. 

I know the standard cover does the job just fine, but ever since I saw one of these on a Capo motor I’ve wanted one as well – it just looks so much better. And besides, the weight saving alone must be worth at least 10 mph on the top end – right? 😉 

Aprilia Caponord ETV1000 Rally-Raid Zero Leak low profile clamp stainless steel
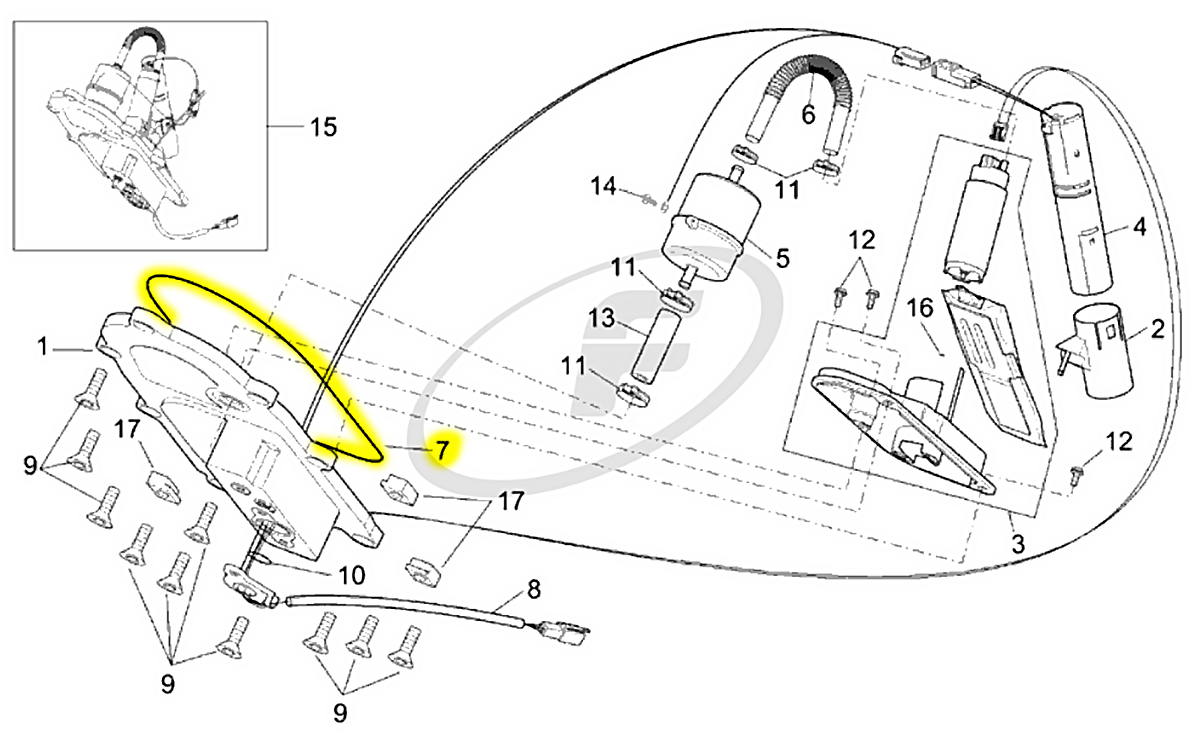
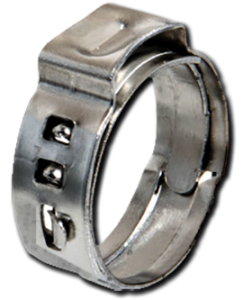
Swapping over only takes a couple of minutes …. 8xM5 bolts and a click clamp to remove. I exchanged the old one for a nice new Zero-Leak low profile Stainless Steel 11.3mm version – very snug! In fact the old one wasn’t really squashing the pipe onto the siggot anymore and could be pulled/pushed/rotated very easily, which makes me think it was no longer vacuum tight ….hmm. Anyway, the new one crimped up lovely and everything is supper-sealed once again.

Capo memorabilia

Aprilia Caponord ETV1000 Rally-Raid dealer brochureMany years ago I asked someone who owned a Rally-Raid dealer brochure for a scanned copy. That scan is still available in the ‘downloads’ section of this website to this day. Today however, after all these years, I finally OWN that exact brochure! Luckily I happened to have a quick look on Ebay last week and there it was, the same brochure up for sale. Thankfully I was the only bidder.

It arrived yesterday in excellent condition and what a delight it was to finally hold the genuine article in my hand. Given the short production run of the Raid, it makes me wonder how many of these brochures still exist. Any left in the dealers probably went to landfill and those that made it home probably went the same way over time. The odd one may be hiding in a stack of magazines or hidden at the back of a dusty cupboard no doubt, but it won’t be many.

Now I have an original, I realise that the scanned copy isn’t quite telling the whole story …… some pages are missing and unlike the standard Capo brochure, it has several fold-out pages as well. Hopefully I can update the scanned copy in a week or two.

In the end I’m just really excited to add this to the growing list of Capo related items I have squirrelled away, somehow though this one item adds the finishing touch to owning a Rally-Raid. It only took 11 years to get it!

Seal of disapproval

Aprilia Caponord ETV1000 Rally-Raid AP8144478 O-ring fuel pump plateFair to say, things have REALLY dragged on this year. The fuel tank overhaul I mentioned in May and planned to do in July is still firmly on the to-do list -why?

I had 90% of the parts on the shelf in June and only had a couple of ‘O’-rings to order. The parts lists don’t give a size for these particular seals, so I needed new ones from Aprilia to measure for future reference – no problem really, they’ll only take a week or so to arrive I thought. Yeah right.

So I put together a list of parts and punched them into the Fowlers online ordering form. All items were available – except one. The dreaded ‘back order’ item. The deal was, wait for the back-order part and we’ll ship them all together, or we’ll send the in-stock items and charge you £3.95 to post the one remaining tiny back-order item. I decided to wait. 

And wait they made me do alright ….. almost two months in fact!

In the end the parts arrived of course, but by then the warm and dry summer weather had given way to almost daily rain and nights drawing in earlier and earlier. But on a positive note, I have now measured the main O-ring I was interested in and can finally post up the size and alternative (UK) that you can have delivered within a day or two, not months! Far quicker and quite a saving on the £30.30 plus delivery for the genuine part.

AP8144478 Equivalent:     142.88mm ID  5.33mm cross section – Viton

£13.91 plus VAT (for two) from Simply Bearings Ltd (October 2019) – Thanks to Beasthonda for measuring for me!


TuneECU IS your friend … just don’t forget it!

Aprilia Caponord ETV1000 Rally-Raid TuneECU TPS resetI’ve just had a fun few hours preparing the Capo for its MOT (annual inspection) and one of the issues I wanted to get around to sorting was the slightly high tick-over.

For quite a few months now the idle has been 1,500 – 1,550 when warm – not enough to be troublesome, but noticeable. Problem is ….. I’ve plain forgot to do anything about it once the ignition was turned off! So today I dusted off the cable and charged the old ASUS notebook and plugged in.

Thankfully it was just as I hoped, the TPS (Throttle Position Sensor) was not at zero with a closed throttle. It was reading 1%. A tap on the ‘TPS Reset’ had it reading 0% and the idle was fine once again. So, the question is, have I got a TPS on its way out, or was it simply the fact that I hadn’t done a reset in 18 months ( 20K+ miles), something I used to do at every service. I’m hoping it’s the latter and will endevour to make sure I hook up TuneECU during all future services. Funny really that a tool I used to hook up on an almost weekly basis slowly slid to the dark recesses of the workshop over time.

Suits you sir!

How long should a textile bike suit last? In the case of my old Halvarssons Safety Suit, 15 years seems about right! In all fairness though, the Safety Suit is a bit of an odd-ball when it comes to bike clothing. An interchangeable outer waterproof ‘skin’ with the Safety Suit itself sandwiched between the skin and the inner thermal liner. 

With care and washed in accordance with manufacturers instructions, the only bits that seem to wear are the inner and outer skin. TBH I ditched the inner years ago as it made the suit too damn hot, even in winter!  The outer skin has been changed a couple of times, but in the end they all lose waterproofing eventually and now it seems, there’s just none about since Halvarssons stopped making the suit.

In the end a chap can only take being warm and wet for so long – the Safety Suit had to go. But what to replace it with? One look at the motorcycle clothing market made it immediately obvious that a lot of changes had taken place over the years – EU PPT Directives as well as advances in materials. Oh and the prices are rather unfriendly as well!

After a great deal of homework and a couple of visits to local stores here in Oxfordshire, I decided on the new Bering Yukon suit. The fit is lovely and it feels like decent quality – I especially like the 5 year warranty! I also like the ‘laminar’ design that bonds Gore-Tex directly to the outer layer …. this (allegedly) means less moisture take-up and faster drying time. We’ll see about that one ……


Fuel Tank Overhaul – Preparation

Last year (I know, a year ago!) I mentioned that the fuel sender was up the spout and the fuel level display was all over the place. In August 2018 I placed an order for a new one and then sat back and waited for a couple of months for it to arrive, then put it on the shelf and went on my merry way, happy to use the trip meter to gauge refuels.

Now though, the website is back up and running and I’ve developed a sudden and strange desire to resurrect all things Capo, such as finally start working toward a complete fuel tank strip and refurb which is long overdue. I had a look on the shelf to find out what I have and what I need to do the job. Here’s the list:

  1. Caswell Epoxy Fuel Tank Sealer (On the shelf)
  2. Aprilia fuel filter – AP8102971  (On the shelf)
  3. Fuel level sender unit – AP8124588  (on the shelf)
  4. Aprilia corrugated fuel hose – AP8144226  (on the shelf)
  5. Wiring loom – AP8124664 (on the shelf)
  6. Short fuel hose ( on the shelf) 
  7. Fuel pump (to purchase)
  8. New Zero-Leak ear clamps (on the shelf) HCL Clamping UK
  9. Seal for loom – AP8144475 (On order)
  10. Pump plate seal – AP8144478 (on order)

So that’s not a bad start … and I’m not sure if I want to change the pump anyway (still pondering this one) and the old seals can be measured and alternatives found if they don’t arrive in time. Applying the Caswells looks like it takes a fair bit of preparation to ensure the job is done once and done right, everything else is plug’n-play or crimp’n screw depending on how you look at it! 

I’m estimating a week overall, allowing plenty of time for the tank to dry after it’s initial cleanout and then a further 48 hrs or so after the epoxy lining is complete prior to reassembly. So the thumb-twiddling time will be put to use rebuilding the fuel pump/filter assembly.  The downside appears to be the Caswell resin …. it’s very sensitive to the temperature range it’s applied at – and I only have an unheated garage to work in these days. So I think the job will have to be carefully timed to suit a week of warm, dry weather in the UK (yes I get the irony!) – Late June or July maybe?

Anyway, more on this as a suitable time approaches. Finger crossed! 

May update

Aprilia Caponord ETV1000 Rally-Raid rear panelsWell it looks like the website is up and all the links work again – hooray! In the end it took about 24hrs of fiddling in the database to sort out, but I got there in the end thankfully.

Meanwhile, the rear panels were removed from the Capo for a trip to the paint shop. The years have been pretty kind to the base coat, but not the lacquer unfortunately, especially where the decals are located. As luck would have it, I already have a set of decals that were kindly given to me by Manuel from Motrag.com a few years ago.

We use chippingnortonbodyshop.co.uk for some parts on our autonomous cars and the results have always been excellent, so it’s fantastic that they are willing to have a look at the Capo panels for me. Plus it’ll be great to finally get a color match given that Aprilia don’t provide paint codes.

Finally back again!

Saturday 27th April

Oh boy, where to start …… first, last year was a real learning curve with a new job., so the number of posts fell through the floor. Then is late 2018 my website host said they were shutting their doors – move your domain (and name) or lose it. I did ….. and that’s when everything went horribly wrong!

Through December to February I tried all sorts to get it to spring into life again, but nothing seemed to work ….. and frankly I was steadily getting pissed off with the whole thing. In the end I hardly glanced at it for a couple of months.

Then this morning, while thinking of something totally remote from websites, an idea popped into my head and I sat down at the PC ….. a couple of hours later, the website popped back into life-ish! Unfortunately, it’s still not right, but it’s a start and I think I can get the rest of the links to work over the next week or so.

Sunday 28th April

The website theme has been updated and is now based on the WordPress 2017 one … the old one was from 2010! This adds a load of new functionality (some good, some a nuisance!)  but should look better on bigger screens. I’ve also sorted the links to loads of pics from pages … yet to do posts. The downside (more frustration really) is that the links to PDF documents won’t sort themselves out. The links are fine but they just loop around to a 404 page. Oh well, that’s for next week!